文章目录
1.python-docx官方文档
https://python-docx.readthedocs.io/en/latest/index.html
2.安装
pip install python-docx
3.使用
3.1 打开文档
from docx import Document

# 新建文档
document = Document()

# 打开旧文档
document = Document('模板.docx')
3.2 修改文档中现有的表格
from docx import Document
from docx.enum.table import WD_ALIGN_VERTICAL
from docx.enum.table import WD_TABLE_ALIGNMENT
from docx.shared import RGBColor

# 获取从开始的第3个表格
table = document.tables[2]

# 获取表格内容
value = table.cell(0, 0).text

# 写入表格内容
table.cell(0, 0).text = '无法设置样式的内容'
table.cell(0, 0).paragraphs[0].add_run('可设置样式的内容')

# 给增加的行添加5行内容内容,并设置样式
for i in range(1, 5):
	# 给表格增加行数并获得行对象
	row_cells = table.add_row().cells
	run0 = row_cells[0].paragraphs[0].add_run('序号')   #第一列添加序号
	run1 = row_cells[1].paragraphs[0].add_run('名称')   #第二列添加名称
	row_cells[0].vertical_alignment = WD_ALIGN_VERTICAL.CENTER #第一列垂直对中
	row_cells[1].vertical_alignment = WD_ALIGN_VERTICAL.CENTER #第二列垂直对中
	row_cells[0].paragraphs[0].alignment = WD_ALIGN_PARAGRAPH.CENTER #第一列水平居中
	row_cells[1].paragraphs[0].alignment = WD_ALIGN_PARAGRAPH.LEFT #第二列水平靠左
	run0.font.color.rgb = RGBColor(255, 0, 0) #第一列添加字体的颜色
	run1.font.color.rgb = RGBColor(255, 0, 0) #第二列添加字体的颜色

# 修改后覆盖原文件
document.save('模板.docx')
3.3 添加文档
3.3.1 添加段落
from docx import Document
# 打开旧文档
document = Document('模板.docx')
# 设置文档’Normal‘样式
document.styles['Normal'].font.size = Pt(12)
document.styles['Normal'].font.color.rgb = RGBColor(0x00, 0x00, 0x00)
document.styles['Normal'].font.name = u'宋体'
document.styles['Normal']._element.rPr.rFonts.set(qn('w:eastAsia'), u'宋体')
# 设置文档’Heading 2‘样式
document.styles['Heading 2'].font.size = Pt(15)
document.styles['Heading 2'].font.color.rgb = RGBColor(0x00, 0x00, 0x00)
document.styles['Heading 2'].font.name = u'宋体'
document.styles['Heading 2']._element.rPr.rFonts.set(qn('w:eastAsia'), u'宋体')
document.styles['Heading 2'].font.bold = True
# 设置文档’Heading 3‘样式
document.styles['Heading 3'].font.size = Pt(15)
document.styles['Heading 3'].font.color.rgb = RGBColor(0x00, 0x00, 0x00)
document.styles['Heading 3'].font.name = u'宋体'
document.styles['Heading 3']._element.rPr.rFonts.set(qn('w:eastAsia'), u'宋体')
document.styles['Heading 3'].font.bold = True
# 定义段前、段后和行间距
SPACE_BEFORE = 10 # 段前距离(单位:磅)
SPACE_AFTER = 12 # 段后距离(单位:磅)
SPACE_LINES = 19 # 行间距离(单位:磅)
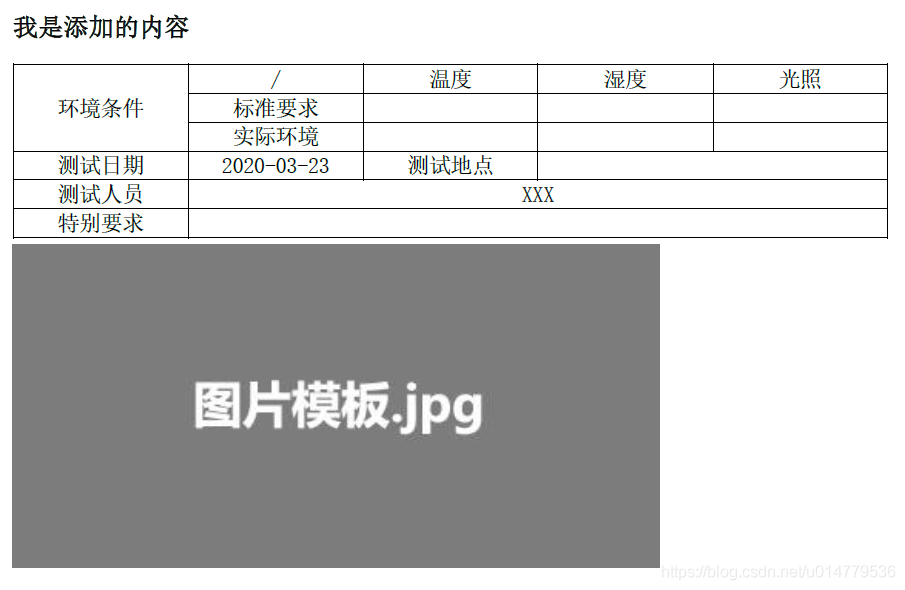
# 添加段落
p = document.add_paragraph(style='Heading 2')
run = p.add_run("我是添加的内容")
p.paragraph_format.space_before = Pt(SPACE_BEFORE)
p.paragraph_format.space_after = Pt(SPACE_AFTER)
p.paragraph_format.line_spacing = Pt(SPACE_LINES)
run.font.name = '宋体'
run._element.rPr.rFonts.set(qn('w:eastAsia'), u'宋体')
run.font.size = Pt(14) # 字体大小
run.font.bold = True # 是否粗体
# 修改后覆盖原文件
document.save('模板.docx')
3.3.2 添加表格
from docx import Document
from docx.shared import Pt,RGBColor  #磅数,颜色
from docx.enum.text import WD_ALIGN_PARAGRAPH
from docx.enum.table import WD_ALIGN_VERTICAL
from docx.enum.table import WD_TABLE_ALIGNMENT

# 打开旧文档
document = Document('模板.docx')

table = document.add_table(rows=6, cols=5, style='Table Grid')

table.alignment = WD_TABLE_ALIGNMENT.CENTER
table.style.font.color.rgb = RGBColor(0x00, 0x00, 0x00)

table.cell(0, 0).merge(table.cell(2, 0))
table.cell(3, 3).merge(table.cell(3, 4))
table.cell(4, 1).merge(table.cell(4, 4))
table.cell(5, 1).merge(table.cell(5, 4))

table.cell(0, 0).paragraphs[0].add_run('环境条件')
table.cell(0, 1).paragraphs[0].add_run('/')
table.cell(0, 2).paragraphs[0].add_run('温度')
table.cell(0, 3).paragraphs[0].add_run('湿度')
table.cell(0, 4).paragraphs[0].add_run('光照')
table.cell(1, 1).paragraphs[0].add_run('标准要求')
table.cell(2, 1).paragraphs[0].add_run('实际环境')
table.cell(3, 0).paragraphs[0].add_run('测试日期')
table.cell(3, 2).paragraphs[0].add_run('测试地点')
table.cell(4, 0).paragraphs[0].add_run('测试人员')
table.cell(5, 0).paragraphs[0].add_run('特别要求')

for i in range(0, 6):
    for j in range(5):
        table.cell(i, j).paragraphs[0].alignment = WD_ALIGN_PARAGRAPH.CENTER
        table.cell(i, j).vertical_alignment = WD_ALIGN_VERTICAL.CENTER

table.cell(3, 1).paragraphs[0].add_run('2020-03-23')
table.cell(4, 1).paragraphs[0].add_run('XXX')

#
table = document.add_table(rows=2, cols=4, style='Table Grid')
table.autofit = True
table.cell(0, 0).width = Cm(5)
table.cell(1, 0).width = Cm(5)
table.cell(0, 1).width = Cm(5)
table.cell(1, 1).width = Cm(5)
table.cell(0, 2).width = Cm(5)
table.cell(1, 2).width = Cm(5)
table.cell(0, 3).width = Cm(2)
table.cell(1, 3).width = Cm(2)
table.alignment = WD_TABLE_ALIGNMENT.CENTER

document.save('模板.docx')
#设置表格宽度
table = document.add_table(rows=2, cols=4, style='Table Grid')
table.autofit = True
table.cell(0, 0).width = Cm(5)
table.cell(1, 0).width = Cm(5)
table.cell(0, 1).width = Cm(5)
table.cell(1, 1).width = Cm(5)
table.cell(0, 2).width = Cm(5)
table.cell(1, 2).width = Cm(5)
table.cell(0, 3).width = Cm(2)
table.cell(1, 3).width = Cm(2)
table.alignment = WD_TABLE_ALIGNMENT.CENTER

table.cell(0, 0).paragraphs[0].add_run('内容1').bold = True
table.cell(1, 1).paragraphs[0].add_run('内容2')

for i in range(0, 2):
   for j in range(0, 4):
       table.cell(i, j).paragraphs[0].alignment = WD_ALIGN_PARAGRAPH.CENTER
       table.cell(i, j).vertical_alignment = WD_ALIGN_VERTICAL.CENTER
3.3.3 添加图片
from docx import Document
from docx.shared import Inches  # 图片尺寸

# 打开旧文档
document = Document('模板.docx')

document.add_picture('./图片模板.jpg', width=Inches(5))

document.save('模板.docx')
最终效果如下:
附:获取桌面路径方法
    def get_desktop(self):
        key = winreg.OpenKey(winreg.HKEY_CURRENT_USER,
                             r'Software\Microsoft\Windows\CurrentVersion\Explorer\Shell Folders')
        # print(winreg.QueryValueEx(key, "Desktop")[0])
        Desktop_path = winreg.QueryValueEx(key, "Desktop")[0]
        Desktop_path = re.sub(r'\\', "/", Desktop_path)

        return Desktop_path
作者:超级大洋葱806
原文链接:https://blog.csdn.net/u014779536/article/details/105054243